Contents
 Introduction
Requirements
User Interface
House Area
Furniture Panel
Furniture Images
Room Config Panel
Room Layout Commands
Saving a Picture of Your House
Introduction
This is the help file for the Gaia Housing Simulator (GHSim). I figured that an actual help file with instructions
is needed for this program, since it's a bit complex and looks overwhelming at first.
If you have any questions, please post them in my thread.
Requirements
The GHSim does not need much in order to run. Your browser must have JavaScript enabled and have a nice, solid support for CSS. Chances are that if you're able to browse Gaia without any severe problems, the GHSim will likely work just fine for you.
The GHSim has been tested on various browsers. Below are two lists: one of the operating systems and browsers that
it works on, and ones it is confirmed to not work on.
Supported Operating System/Browser Combos
Windows XP
- Internet Explorer 6
- Mozilla Firefox 1.5.0.6
The GHSim is developed on WinXP Internet Explorer 6 and Mozilla Firefox 1.5.0.6.
Mac OS X 10.4.7
- Mozilla Firefox 1.5.0.6
- Netscape Navigator 7.2
NOTE: Image swapping in NN 7.2 is slightly quirky. The image will not fully change immediately, but it seems that moving the cursor over or moving the object will make it display correctly. - Safari 2.0.4
NOTE: To use the drop-down menus, you must hold the control key. Also, the menu items that are not available will not be colored as such, you will only be informed by the message below and the fact that the tile is unavailable. Unavailable objects, however, are still visibly marked as unavailable.
Unsupported Operating System/Browser Combos
Windows XP
- Netscape Navigator 6.2.2
- Opera 6.06
User Interface
This is probably the part you came to see. This program can be a tricky little bastard, but I've made extensive attempts to ensure that the interface is as easy to use as possible.
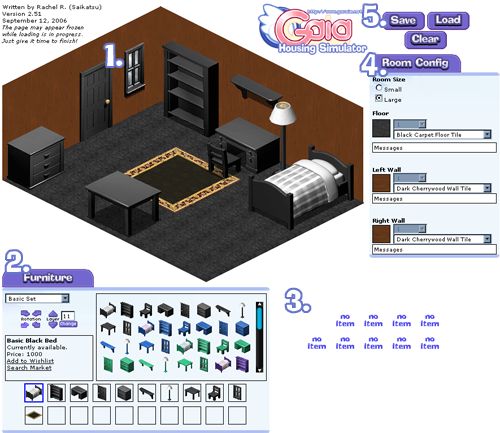
1. House Area
This is where all the magic/code comes together. The menus in the Room Config Panel control the size of the room and the
wall/floor designs, while the Furniture Panel is responsible for changing the furniture objects.
Back to User Interface top
Back to Top

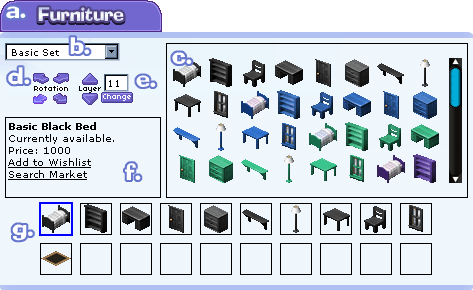
- Panel Tab
- Set Filter
- Object Selection Window
- Object Rotation
- Object Layer
- Object Information
- Object Slots
a. Panel Tab
By clicking and dragging the panel from this tab, you can move the panel around the screen.
b. Set Filter
This menu allows you to load different object sets into the Object Selection Window. Only one set can be loaded
at a time.
Technical Details: The GHSim does not load in the HTML and graphics for all the sets at startup, only the Basic set.
The first time you select a set, it will take a moment to load in the new set. After this, if you select another set
and then go back to the one that was previously loaded, the switch will be made instantly. However, if you refresh the
page, it will have to load in the scripts again, but the graphics will load a little faster due to their being in your
browser's cache.
c. Object Selection Window
The object set you choose from the Set Filter will be displayed here. Clicking on an object's icon will change the
object in the currently selected slot to the object that was clicked on.
d. Object Rotation
The arrows, when clicked, will change the object in the currently selected slot to face the corresponding direction.
If an object does not rotate, these arrows will all be gray. If the object is placed on the walls, the northeast and
northwest arrows will be grayed out, and clicking on them will simply rotate the object southeast and southwest respectively.
e. Object Layer
The up and down arrows will shift the object in the currently selected slot up or down by a single layer. The text box to
the right of the arrows displays the layer the object is on. This can be changed directly by typing in a new number, then
pressing the  button below the box.
f. Object Information
This box displays the name, availability, price, and wishlist/marketplace search links for the object in the currently
selected slot. The wishlist and marketplace links will open in a new window.
The marketplace search is set to be sorted by the Buy Now price.
g. Object Slots
The GHSim has 20 slots available to use for placing objects. Clicking on a slot will activate it, and all changes you make
will be saved to that slot until you select another slot.
The current slot can also be changed by clicking on the object itself.
Back to User Interface top
Back to Top
3. Furniture Images
The objects start out in this area, with an image that says "no item". To move an object, click and drag it.
If an object you have selected is not yet available, it will change to the default "no item" image.
Back to User Interface top
Back to Top
 |
|
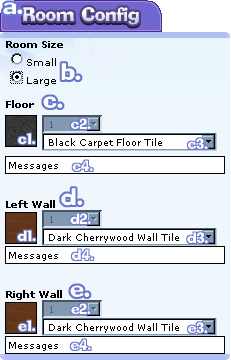
a. Panel Tab
By clicking and dragging the panel from this tab, you can move the panel around the screen.
b. Room Size Selection
This sets the size of the room. Small is a house as you first get it, Large is after being upgraded.
c. Floor Settings
c1. Icon
Shows the icon for the selected floor tile.
c2. Pattern
Changes the tile pattern. This is currently disbled.
c3. Tile Selection
This drop-down menu contains all the choices for tiles.
c4. Availability
If the tile you selected is unavailable, a message about it will display here.
d. Left Wall Settings
d1. Icon
Shows the icon for the selected wall tile.
d2. Pattern
Changes the tile pattern. This is currently disbled.
d3. Tile Selection
This drop-down menu contains all the choices for tiles.
d4. Availability
If the tile you selected is unavailable, a message about it will display here.
e. Right Wall Settings
e1. Icon
Shows the icon for the selected wall tile.
e2. Pattern
Changes the tile pattern. This is currently disbled.
e3. Tile Selection
This drop-down menu contains all the choices for tiles.
e4. Availability
If the tile you selected is unavailable, a message about it will display here.
Back to User Interface top
Back to Top
 |
|
a. Save Button
Clicking on this button will save your room layout to a cookie file. This will only save furniture, not the room size,
wall tiles or floor tiles.
b. Load Button
This button will load a previously saved room.
Small Note: Sometimes, the layering will be a bit jumbled when loaded. This is being looked in to.
c. Clear Room Button
This button clears the objects from the room and resets it to the defaults.
Back to User Interface top
Back to Top
Saving a Picture of Your House
At this time, the GHSim cannot save a picture of your house for you. If you want to save a picture of your setup, you
will need to make a screen capture. For detailed instructions on taking a screen capture, you can visit a thread in
Gaia Guides and Resources by a user named Dino:
Taking Screen Caps: ALL Platforms. DIALUP BEWARE!(many imgs)